Monday, December 27, 2021

Roasted Sweet Potatoes, Apples and Cranberries


Sweet Potates are one of my very favorite fall/winter foods. We almost always have sweet potatoes in our kitchen from our favorite local produce farm because they are so versatile and can be used in stews and soups, mashed, souffled or fried, but roasted is one of my absolute favorite ways to cook them.

Sweet potatoes also pair well with so many things, but are especially delicious as an accompaniment to grilled or roasted poultry or pork.


The first time I made this dish, my husband who is NOT normally a big veggie or fruit eater, absolutely demolished his portion. He love it, and declared right then, "that's a keeper!" 

Did you know?
Sweet potatoes are known to be a great source of beta-carotene, but they also deliver good sources of vitamin A, a good source of vitamin C, and are full of manganese, calcium, potassium, iron, vitamin B6 and fiber.

Sounds good? It gets better: the sweet potato has a lower glycemic index than the potato.


RECIPE
Ingredients
1 lb sweet potatoes or about 2 medium-sized sweet potatoes  
1 honeycrisp apple (or any hard crunchy apple)
1 cup cranberries
2 tablespoon olive oil
1/3 cup maple syrup
1 teaspoon cinnamon
1/2 teaspoon salt

Method
Heat oven to 350. Spray a medium-size 9x9 baking pan or casserole dish with cooking spray. 

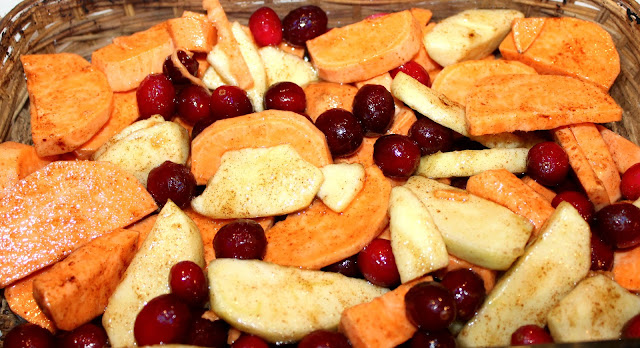
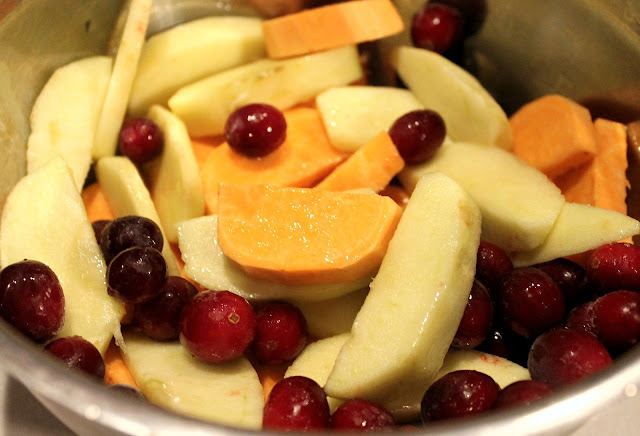
Peel the sweet potatoes then cut them in half and slice the potatoes into 1/4-inch half-moon shapes. Add them to a large bowl.

Peel and cut the apples in half, then into quarters. Remove the core and seeds. On a cutting board, slice the apple quarters into 1/4-inch slices. Add the apples to the sweet potatoes.

Add the cranberries, olive oil, maple syrup, cinnamon, salt to the sweet potatoes and apples and mix to combine.

Place the mixture into the prepared baking pan. Roast the sweet potatoes for 45 minutes or until the potatoes and apples are nice and tender. Stir several times during baking.

Remove from the oven and serve while hot. Any leftovers can be stored in the refrigerator for several days. To reheat, simply pop in the microwave to warm up.

Recipe adapted from One Hot Oven

Enjoy,
Mary

© Cooking with Mary and Friends. Unauthorized use and/or duplication of this material without express and written permission from this blog’s author and/or owner is strictly prohibited. Excerpts and links may be used, provided that full and clear credit is given to Cooking with Mary and Friends with appropriate and specific direction to the original content.


Wednesday, December 8, 2021

Marinated Mushrooms


This Marinated Mushroom recipe is one of those very rare canning recipes where oil of any kind is used and approved to be used by the USDA and the National Center for Home Food Preservation.

Marinated mushrooms make use of herbs, zesty garlic, crushed red pepper flakes and black peppercorns for some zing. Nibble straight from the jar or add to salads, antipasto plates, or charcuterie plates. They are surprisingly easy to make and make a wonderful treat to have in your pantry.


What do you need to make marinated mushrooms?

  • Whole button mushrooms
  • Bottled lemon juice
  • Olive or Salad Oil
  • Oregano, Basil and Red Pepper flakes
  • Whole Black peppercorns
  • Canning or Pickling salt
  • Chopped onions
  • Diced Pimentos (or any pepper)
  • Garlic cloves

No worries if the oil and vinegar separate a bit over time. Just give them a good shake before you open the jar.


RECIPE

Ingredients

7 lbs small whole button mushrooms
1/2 cup bottled lemon juice
2 cups olive or salad oil
2-1/2 cups white vinegar (5 percent acidity)
1 tbsp oregano leaves
1 tbsp dried basil leaves
1 tsp red pepper flakes
1 tbsp canning or pickling salt
1/2 cup finely chopped onions
1/4 cup diced pimento (or any mild pepper)
2 cloves garlic, cut in quarters
25 black peppercorns

Method
Select very fresh button mushrooms with caps less than 1-1/4 inch in diameter. Wash mushrooms well. 
Cut larger mushrooms in half or quarters and cut stems, leaving 1/4 inch attached to cap. Add lemon juice and water to cover. Bring to boil. Simmer 5 minutes. Drain mushrooms. 

Mix olive oil, vinegar, oregano, basil, red pepper flakes and salt in a saucepan. Stir in onions and pimento or peppers and heat to boiling. Place 1/4 garlic clove and 2-3 peppercorns in a half-pint jar. Fill jars with mushrooms and hot, well-mixed oil/vinegar solution, leaving 1/2-inch headspace.

Wipe rims with a clean cloth, cover jars with lids and bands and process half-pint jars 20 minutes in a boiling water bath or steam canner.

Remove jars from canner and let sit on a kitchen towel on your countertop 24 hours undisturbed. Jars are sealed when button on top of lid is fully depressed and won't flex up and down.

Yield: approx. 8 half-pint jars

Recipe source: Marinated Whole Mushrooms. Andress, Elizabeth L. and Judy A. Harrison. So Easy to Preserve. University of Georgia Cooperative Extension. Bulletin 989. Sixth Edition. 2014. Page 143.

Enjoy,
Mary

© Cooking with Mary and Friends. Unauthorized use and/or duplication of this material without express and written permission from this blog’s author and/or owner is strictly prohibited. Excerpts and links may be used, provided that full and clear credit is given to Cooking with Mary and Friends with appropriate and specific direction to the original content.


Sunday, December 5, 2021

Canning Mushrooms


Over the past year I've been lucky to be able to purchase freshly dug button mushrooms from a local farmer at the farmers market. Honestly it can't get better than dug Friday morning and in my hands Friday afternooon. Of course they have been delicious fresh, but I've also put up some fantastic marinated mushrooms, and now these sliced canned mushrooms.


Home-canned mushrooms are absolutely fantastic. These are not like jarred mushrooms from the store which can be metallic tasting and rubbery-textured.


These really are a great product to have on hand in your pantry and they do taste so fresh and mushroomy. I am very happy I spent the time putting them up.

What do you need to make canned mushrooms?

  • fresh button-type mushrooms 
  • water
  • salt (optional)
  • 1/2 pint or pint canning jars
  • a pressure canner (not a pressure cooker)


RECIPE

Ingredients

Whole button mushrooms
Boiling water
1/4 tsp salt per half-pint jar (optional)

Method
Trim off and discard stem ends. Soak in a sink, or large pot or bowl, full of cold water. Soak for 10 minutes to loosen any dirt; wash mushrooms well to remove any dirt.

Slice mushrooms and place in a pot with water, bring to a boil and boil 5 minutes. Remove from heat and drain.

Pack mushrooms into 1/2 pint or pint jars leaving 1-inch headspace. Top with 1/4 tsp salt per half-pint jar (optional) and clean boiling water maintaining headspace; remove any air bubbles by running a plastic knife arouond the inside of the jar moving it up and down; adjust headspace as needed. Wipe jar rims and put lids on. Process in pressure canner 45 minutes at 10 lbs pressure adjusting for altitude.

Once processing time is done, remove from heat and allow the canner to come down off the pressure on its own. Once the pressure is gone, remove the lid part way, let cool a few minutes then take lid completely off. Remove jars and allow them to sit undisturbed on a kitchen towel on your countertop 24 hours. 

Jars are sealed when button on top of lid is fully depressed and won't flex up and down. Store jars in pantry. Opened jars must be refrigerated.

Yield: varies depending on how many mushrooms your have and their size. I had about 6 pints whole mushrooms and got 8 - half pint jars of sliced mushrooms.

Recipe follows guidance from the NCHFP

Enjoy,
Mary

© Cooking with Mary and Friends. Unauthorized use and/or duplication of this material without express and written permission from this blog’s author and/or owner is strictly prohibited. Excerpts and links may be used, provided that full and clear credit is given to Cooking with Mary and Friends with appropriate and specific direction to the original content.

Wednesday, November 17, 2021

Happy Thanksgiving {A Collection of 30 Recipes}


This is a collection of my family's delicious new and vintage Thanksgiving dishes including everything from the appetizers, rolls, side dishes, entree, desserts, leftovers and bone broth (save that carcass). 

Thanksgiving is my very favorite holiday when we gather with friends and family to simply enjoy the food and the company. To me there's no better way to express your thankfulness for all the blessings you treasure. 

These recipes are a few of the ones we enjoy in my home and I hope you find one or two (or a few) you'd like to add to your Thanksgiving table. 

Wishing all of you a wonderful holiday enjoying food, family and friends, 
Mary

APPETIZERS and ACCOMPANIMENTS


VEGETABLES AND SIDES


MAIN COURSE

DESSERTS


LEFTOVERS

© Cooking with Mary and Friends. Unauthorized use and/or duplication of this material without express and written permission from this blog’s author and/or owner is strictly prohibited. Excerpts and links may be used, provided that full and clear credit is given to Cooking with Mary and Friends with appropriate and specific direction to the original content.


Friday, October 29, 2021

Best Sour Pickles


This summer I was on a quest to make the BEST Sour Pickles ever. I already knew in order to achieve this I'd need the freshest pickling cucumbers, so I sought out my local farmers market and farmer and quickly purchased a bag full of crispy, firm pickling cucumbers. If you are not near a farmers market, buy the firmest pickling cucumbers you can from your local grocery store.


Now normally you would not think of sour pickles containing pickling spice, but trust me when I tell you the pickling spice, and the salt soak, is what made these turn out so well ... so do not skip it, unless you want limpy pickles and no one wants those.


What do you need to make Sour Pickles?
  • Pickling cucumbers
  • Pickling salt
  • Whole peppercorns
  • Yellow mustard seeds
  • Whole allspice
  • Stick cinnamon
  • Water
  • Vinegar


RECIPE
Ingredients
For the pickling spice
3 tbsp whole black peppercorns
3 tbsp yellow mustard seeds
4 tsp whole allspice
1 cinnamon stick, crumbled

For the sour pickles
3 3/4 - 4 pounds pickling cucumbers
1/3 cup pickling salt, plus 1 tsp for the pickling liquid
2 1/2 cups distilled white or apple cider vinegar
2 1/2 cups water
2 tbsp pickling spice (see above, or use store-bought)
Fresh dill and garlic (optional)

For the pickling spice: blend 3 tablespoons whole black peppercorns, 3 tablespoons of yellow mustard seeds, 4 teaspoons of allspice and 1 cinnamon stick, crumbled. Makes 1/2 cup (store remaining pickling spice in a mason jar for use another time).

On the first day:
Trim blossom ends from cucumbers and cut lengthwise into quarters or halves. Place in a bowl and sprinkle with pickling salt. Cover with cold water and mix to dissolve the salt. Place a small plate inside the bowl on top of the cucumbers to keep them submerged. Let stand at cool room temperature or in the refrigerator for 18 hours.

On the second day:
Drain cucumbers, rinse, and drain again. Bring vinegar, water, and 1 tsp pickling salt to a boil. Put pickling spice in a spice bag and simmer in the pickling liquid for 5 minutes. Remove before filling jars.

Fill your canning jars (pints or quarts) with the cucumber spears (It helps to lay the jar on the side and fill the edges first, then the center; this keeps the cucumbers from falling over.) If desired, add 2 cloves garlic and 2 or 3 sprigs of dill (or 1 tsp dried dill weed or seed to each jar). 

Pour brine over top of cucumbers leaving 1/2-inch headspace. Slide a plastic knife between cucumbers and jar to remove air bubbles adjusting brine as needed to maintain 1/2-inch headspace.

Wipe rim and threads of jar with a clean, damp cloth. Cover jars with lids and bands. 

Process pints and quarts 15 minutes in a boiling water bath or steam canner.

Remove jars from canner and set them upright on a dry towel or rack to cool. Let jars cool for 24 hours. Jars are sealed when button on top of the lid is fully depressed and won't flex up or down.

Store in pantry for up to one year. Open jars must be refrigerated.

Cook's note - For best results let sit for 4 weeks before opening a jar to allow all the flavors to meld together.

Enjoy,
Mary

© Cooking with Mary and Friends. Unauthorized use and/or duplication of this material without express and written permission from this blog’s author and/or owner is strictly prohibited. Excerpts and links may be used, provided that full and clear credit is given to Cooking with Mary and Friends with appropriate and specific direction to the original content.


Monday, October 18, 2021

Cowboy Candy Relish


While we all love my Jalapeno Pickle Relish, I recently had the idea to make Cowboy Candy Relish using the same brine as Cowboy Candy ... and ... oh ... my ... goodness! It's soo good y'all and extremely versatile.


What do you need to make Cowboy Candy Relish?
  • 3 lbs jalapenos
  • 1 medium white onion
  • White vinegar
  • Sugar
  • Celery seed
  • Turmeric
  • granulated garlic
  • food processor or sharp knife and cutting board
  • Measuring cup
  • Mesh strainer
  • Water bath or steam canner
  • Half-pint canning jars
How to use it?
  • Top it on burgers, brats or hot dogs
  • Mix it into Jalapeno Popper Dip or Crack Ranch Dip
  • Mix it into pimento cheese for a punch of heat
  • Add it to egg salad, potato salad or chicken salad
  • Mix it with mayo for a twist on tartar sauce
  • Add it to Queso 
  • Sprinkle some over Nachos

Jalapeno Popper Dip (cream cheese, sour cream, cheddar cheese,
Cowboy Candy relish, panko crumbs, shredded parmesan and melted butter)

RECIPE

Ingredients
3 lbs jalapenos, fresh and firm
1 small to medium onion, minced
2 cups distilled white vinegar 
6 cups granulated sugar
1⁄2 tsp turmeric
1⁄2 tsp celery seed
2 tsp granulated garlic
1 tsp ground cayenne pepper

Method
Wearing gloves if desired, slice the stems from the jalapenos and discard. Slice in half and seed if desired, or leave the seeds in. Dice or mince the peppers and onion in a food processor using the chopping blade. 

In a large pot, bring vinegar, white sugar, turmeric, celery seed, garlic and cayenne pepper to a boil. Reduce heat and simmer for 5 minutes. Add the minced peppers, and onion; simmer for 4 minutes.

Strain relish through a mesh strainer over a bowl reserving the brine. Scoop the relish
 into canning jars leaving 1/2 inch head-space.

Add the syrup back to the pot and bring to a full rolling boil. Boil hard for 6 minutes.

Using a ladle, add the boiling syrup to the jars over the 
minced peppers, distributing it evenly between all the jars, leaving a 1/2-inch head-space. Use a small knife, or a plastic canning tool designed to remove air bubbles, and run it around the insides of the jars, moving it up and down to remove any air bubbles. Adjust the level of the syrup if necessary.

Wipe the rims of the jars with a clean, damp paper towel and top jars with lids and bands.

Process jars in a boiling water bath or steam canner 10 minutes for half-pints adjusting for your altitude.

Transfer the jars to a dish cloth-covered space on your counter-top and let jars sit undisturbed for 24 hours.

Cooks note - yield depends on size of peppers used and how fine the peppers and onion are diced or minced; approx. 4-6 half-pints.

Enjoy,
Mary

© Cooking with Mary and Friends. Unauthorized use and/or duplication of this material without express and written permission from this blog’s author and/or owner is strictly prohibited. Excerpts and links may be used, provided that full and clear credit is given to Cooking with Mary and Friends with appropriate and specific direction to the original content.


Sunday, October 10, 2021

Mixed Peppers Pepper Jelly


All summer long we had a a variety of peppers growing in our raised bed garden. It's truly amazing how many peppers just a few plants will produce, but the peppers kept coming and coming. At times I felt like I was part of some sort of never ending story! Bear in mind all these peppers all summer long came from ONE of each type of plant ... wow!


I made a variety of pepper products such as pickled peppers, pepper relish, Cowboy Candy (candied jalapenos), Cowgirl Candy (candied mild peppers), then suddenly thought why not a mixed peppers pepper jelly? You know, one with all the flavor but much less heat that would be great for those folks who just can't handle the spice.


So with some Mad Hatter Peppers, Mild Hatch Chiles, Banana Peppers and just a handful of Jalapeno Peppers this Mixed Peppers Pepper Jelly was born. And oh my goodness, it is sooooooo delicious.


What do you need to make Mixed Peppers Pepper Jelly?

  • 2 cups mixed minced mild/sweet peppers such as red or orange bell peppers, Mad Hatter peppers and mild Hatch chile or Banana peppers (any combo of mild peppers works)
  • 1/2 cup seeded and minced jalapeno peppers
  • Sugar
  • Sure-Jell (yellow box powdered fruit pectin 1.75 oz)
  • Vinegar (apple cider or white vinegar 5% acidity)
  • 1 tsp butter
RECIPE
Ingedients
2 cups any combo of mild peppers minced
1/2 cup seeded and minced jalapeno peppers
1 cup apple cider or white vinegar (5% acidity)
1 tsp butter (to reduce foaming)
1 box yellow Sure-Jell fruit pectin
5 cups sugar

Method
Cut and seed peppers then mince in your food processor using the chopping blade. Measure to be sure you have 2 1/2 cups and scoop it all into a stock pot.

Add vinegar, butter and Sure-Jell; stir to mix well. Bring to a boil over high heat  and cook 3 minutes stirring often.

Carefully add sugar all at once and return to a rolling boil stirring constantly. Boil hard one minute.

Remove from heat and ladle into half-pint jars leaving 1/4-inch headspace. Wipe rims with clean cloth and top with lids and bands.

Process in boiling water bath or steam canner 10 minutes. Remove from canner and allow to sit on a kitchen towel on your countertop 24 hours undisturbed. Jars are sealed when the button on the top is fully depressed and won't flex up or down.

Store jars in pantry up to one year. Open jars must be refrigerated.

Yield: 5 1/2 half-pint (8oz) jars

Enjoy,
Mary

© Cooking with Mary and Friends Unauthorized use and/or duplication of this material without express and written permission from this blog’s author and/or owner is strictly prohibited. Excerpts and links may be used, provided that full and clear credit is given to Cooking with Mary and Friends with appropriate and specific direction to the original content.