Showing posts with label beef. Show all posts

Tuesday, June 13, 2017

Grilled Chuck Roast


I am in love with local grass-fed beef! Thankfully we have several grass-fed beef farmers local to me, and this beauty came from my friends at Hill Creek Farms - Hartsville. All of their Angus and Angus-Charolais Beef comes from pasture-raised and grass-fed animals. There are no added hormones and the meat is antibiotic free. The meat is processed at an USDA inspected packing plant where it is dry aged, cut to order, vacuum packed and flash frozen.


My friends and I have ordered several sides of beef from this farm, and every time the beef has been excellent and, I believe, of superior quality to what you can buy in a grocery store. While buying a side of beef is a large investment, it can easily last you a year, making it extremely economical. See the benefits to buying a whole side of beef.


Of course, when you buy a side of beef, you get many different cuts, from sirloins and rib-eyes to chuck roast. Not always wanting the chuck roast to be cooked as a pot roast, I started investigating ways to grill it. Who knew a grilled chuck roast could be so tender and delicious? We sure didn't until we made this recipe. Wow, talk about a "game changer!" This economical cut completely amazed us, exceeding any expectations we had.


RECIPE
Ingredients
1 grass-fed beef chuck roast (approx. 3 lbs)
1/2 cup Soy Sauce (or Teriyaki if preferred)
1/4 cup Worcestershire Sauce
1/3 cup red wine vinegar
1-2 tbsp. grainy mustard 
2 tsp minced garlic
1 tsp course ground black pepper
1/2 cup oil

Method
Combine all marinade ingredients in a large gallon zip-top bag mixing well. Add beef chuck roast, and seal bag removing as much air as possible. Refrigerate and marinate 8-12 hours (or overnight), turning roast a couple of times.

Over direct high heat, sear roast 3 minutes on each side. Reduce heat to medium-indirect heat and continue to grill roast 60 minutes, basting with reserved marinade during last 10 minutes.

Using a meat thermometer, check internal temperature of beef beginning at 40 minutes and every few minutes thereafter, until beef registers an internal temperature of 130 for medium rare or 145 for more medium/well.

Remove roast, cover with foil and let rest 15 minutes before carving roast against the grain and serving.

Also seen on Meal Plan Monday

Enjoy,

Mary

© Cooking with Mary and Friends. Unauthorized use and/or duplication of this material without express and written permission from this blog’s author and/or owner is strictly prohibited. Excerpts and links may be used, provided that full and clear credit is given to Cooking with Mary and Friends with appropriate and specific direction to the original content.

Friday, March 6, 2015

Benefits of Buying A Whole Side of Beef

Adam Frick - West Ridge Farms - Premium Beef

So you're thinking about buying a side of beef, but is there really a benefit? Is it a cost savings? Will you be able to use it all?

I know there are a lot of questions when making this type of decision, but I can tell you from my personal experience, buying a side of beef, and splitting it with another couple, was the best decision we ever made.

But first you need to do your homework. Find out what farms in your area sell directly to consumers. Make an appointment and physically visit the farm, get to know the farmer, learn about their husbandry practices, and see it first-hand for yourself.

Cathy Taylor - Seldom Rest Farm

Ask questions! Is it grass-fed and grain finished? Or is it all grass-fed? If grain finished, what type of grain is used? If organic is important to you, ask if it's organic! Most farmers are more than happy to have you visit and talk to you about their farm, and I would stay away from any who are not.

See my trips here to West Ridge Farms - Premium Beef  Hill Creek Farms - Hartsville and Seldom Rest Farm

To find local farms near you check out Local Harvest, Farmer's Pal, or Eat Wild.


John Rogers - Hill Creek Farms - Hartsville

Here are a few reasons why buying meat in bulk makes sense:
  • More economical! A side of Grass-Fed Angus Beef from a local farm runs around *$6.59 lb. which includes all cuts of beef from roasts and tenderloins, to stew beef and ground beef, plus lessor known cuts such as Hanger Steak or Skirt Steak (the cost per pound varies depending on your location)
  • You know what you're eating! When you buy your beef from a local farm, you know how their livestock is raised:  
    • humanely on pasture
    • grass-fed
    • no antibiotics or added growth hormones
  • It's a lot of beef! A side of beef yields around 230 lbs. of meat 
  • It is freezer ready! It is already vacuumed sealed by the processor and ready for your freezer 
  • It lasts a long time! Depending on family size, a side of beef lasts up to a year or more
  • You make the "cut choices!" When you order a side of beef from a local farm, you can chose the cuts you want from a "cut sheet" typically provided by the farmer. This is also based on the processor used. So many choices, and they're yours to make! 

  • It's all "prime" beef! If you have ever savored a USDA Prime Graded Steak you know it is delightfully tender and juicy with a buttery flavor which makes it distinctively superior to any other steak. Of all the beef produced in the US, less than 2% is certified as USDA Prime. Typically you will not find USDA Prime in the supermarkets since its limited supply is gobbled up by fine meat purveyors that retail it to upscale restaurants and affluent consumers.
    • The United States Department of Agriculture (USDA) meticulously grades beef at the request of a meat packer. Only beef that is USDA inspected may carry the USDA shield of authenticity. The grading system determines the quality rating of beef based upon a very complicated inspection system which measures the amount of marbling (fat specs) in the rib-eye muscle (lean) portion and combines the maturity (age) of the beef carcass to determine the inspected grade.
    • The higher the ratio of marbling and the younger the beef, the higher the grade. It is the fat marbling which determines tenderness, juiciness and flavor. The age of the beef determines beef texture and also effects flavor. Younger beef produces a finer texture and a lighter red color.
    • Therefore USDA Prime Grade has the highest rating of a combined high ratio of marbling with the youngest maturity of beef. That's why prime is the most flavorful and most tender with the finest of texture. (Source: USDA)
  • It's better for you! Grass-fed beef generally comes from cattle that eat only grass and other foraged foods throughout their lives. Often, conventional beef cattle eat a diet that includes grains, such as corn, at some point. The difference in the diets of the cattle changes the nutrients and fats you get from eating the different types of beef. 
  • Grass-fed beef may have some heart-health benefits that other types of beef don't have. When compared with other types of beef, grass-fed beef may have:
    • Less total fat
    • More heart-healthy omega-3 fatty acids
    • More conjugated linoleic acid, a type of fat that's thought to reduce heart disease and cancer risks
    • More antioxidant vitamins, such as vitamin E
    • Lean beef that's 10 percent fat or less (Source:  Mayo Clinic) 
    • See more here why grass-fed beef trumps grain-fed
  • Do the Math! When we purchased a side of beef, the price was $5.89 lb.* (in 2014). We split the side of beef with another couple, each of us receiving equal amounts of ground beef, steaks, ribs, and roasts. Our total cost was $1,300 so each couple paid $650, making our monthly cost $54.16, and our weekly cost $13.54. While the cost per pound for the ground beef might be higher, the costs of the prime cuts of steaks and roasts are many dollars per pound cheaper which equals a win to me.
  • Use it all! You may receive some beef bones with your side of beef. If you do, use them to make nourishing Beef Bone Broth and anytime a recipe calls for beef stock, use the bone broth. Use it as a beef base in soups, braising meat, gravies, stews, sauces, and reductions. It can also be used to saute' or roast vegetables. 
Grass-Fed Angus Beef  - Hill Creek Farms - Hartsville
I am thankful we have an abundance of local farms doing it "right" for you and me right here in South Carolina. It's tireless hard work, but without our support, they wouldn't be able to continue to do what is their passion, producing a great product for you and me. Does it cost more? Maybe. Is it worth it. Yes!  

Don't have the freezer space yourself for that much beef? Consider what we did and going in on it with other friends or family members, dividing it up between all participants. 

The BEST thing you can do for yourself and your family is just EAT REAL FOOD! Buy it from your local farm, get to know your farmer, and support your local Farmer's market.  I think you'll be happy you did!

* Note - The price per pound quoted here is based on the 2015 price list received from Hill Creek Farms - Hartsville. Your price may vary.

Enjoy,
Mary

Friday, June 13, 2014

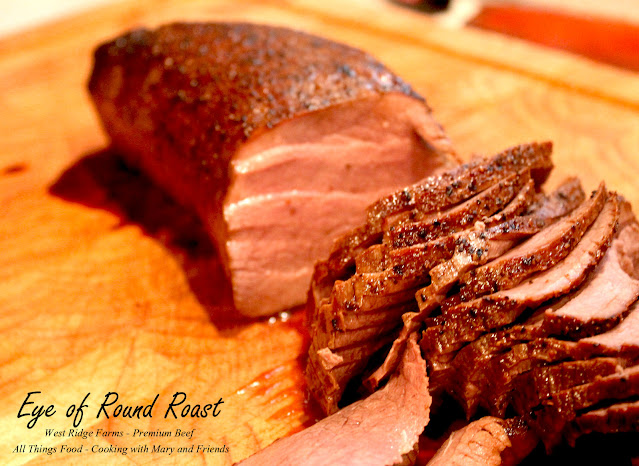
Eye of Round Roast


By far one of the BEST Eye of Round Roast I've ever had and it started with grass-fed beef from West Ridge Farms - Premium Beef where I had the pleasure of meeting owner, Adam Frick, and touring his awesome farm earlier this year.  What they had to say about their beef was important to me "We guarantee that our beef is free of all steroids, added hormones, and antibiotics. Our cattle are raised entirely on pasture and are not confined or sent to feedlots." Read more about this awesome farm here


When considering roasting this Eye of Round Roast, I had read many interesting recipes online, and had a few ideas of my own.  I didn't want this roast to be a "pot roast," but rather a true, roasted beef we could enjoy for dinner and then use for French Dip Sandwiches another day. 

Eye of Round Roast is not known to be the most tender cut of beef. The eye of round is a cut from the round steak section of a beef hind quarter. A round steak actually has 3 different "cuts" in it that you can buy at the grocery store. The bottom round (which can be labeled a London Broil roast), the top round (usually a steak), and the Eye of Round (sold either as a roast or a steak). Of the 3 parts of a round steak,  Eye of Round is the most tender (BUT, it is NOT as tender as a rib eye).

So, after researching things a bit more, I found a way to roast this beef, and make it come out juicy and tender.  How?  High Heat Roasting and it turned out perfectly!


Ingredients
1 - 3.5 lb. Eye of Round Roast
1 tsp. sea salt
1 tsp. course-ground black pepper
1 tsp. garlic powder

Method
Preheat oven to 500 degrees. Remove roast from refrigerator and rub liberally all over with salt, pepper and garlic. Let rest 30 minutes. Place roast in a large roasting pan, fat side up, and roast in oven 7 minutes per pound, or approx. 25 minutes. Turn the oven off completely, yes, TURN OFF OVEN, and leave the roast in the oven for 2 1/2 hours. After 2 1/2 hours, take the roast out and check its internal temp with an instant read thermometer. The temperature should be about 130 degrees. Put the finished roast on a plate and cover it with tin foil, and allow it to rest for 10 minutes. Serve immediately.

As a quick reference, here are the standard temperature levels for roasts:
120-125 = Rare
130-140 = Medium Rare
145-150 = Medium
If you have any concerns your oven won't hold the heat, reduce the oven heat to 170 (after roasting at 500 for the 25 minutes) and check roast after one hour, then every thirty minutes afterward for desired doneness.
Enjoy,
Mary
© Cooking with Mary and Friends. Unauthorized use and/or duplication of this material without express and written permission from this blog’s author and/or owner is strictly prohibited. Excerpts and links may be used, provided that full and clear credit is given to Cooking with Mary and Friends with appropriate and specific direction to the original content.

Wednesday, May 7, 2014

Brazilian Skirt Steak


Wow doesn't even begin to describe the flavor and taste we've discovered with grass-fed beef from West Ridge Farms - Premium Beef!  It is amazingly delicious, and the flavor of the beef really come through. I've tried their Sirloin Tip Roast, Beef Tenderloin Filets, Skirt Steak, Beef Dogs and more, and all of it is just awesome! 


Ingredients
1 - 3.5 lb. Skirt Steak
1 tbls. chili powder
2 tsp. dried oregano
1 tsp. sea salt and course-ground black pepper
1 tbls. red wine vinegar

Method
Mix chili powder, oregano, salt, pepper and red wine vinegar to make a paste. Rub paste all over both sides of the skirt steak. Wrap and store in the refrigerator overnight if you have time or at least 2 hours.

Grill steak on a sear burner for 1 minute on each side, then on direct high 5 minutes each side for medium rare. Let sit covered with foil 5 minutes. Slice thinly across the grain and serve.


Beet Greens Salad with Blackberry Balsamic Vinaigrette
2-3 cups fresh beet greens, stemmed and rinsed
2 tbls. blackberry jam
1 tbls. Dijon mustard
1 tbls. balsamic vinegar
1/2 tsp. course-ground black pepper
1-2 slices red onion, thinly sliced
Rinse beet greens and set aside.  Mix blackberry jam, Dijon mustard, balsamic vinegar and pepper until well blended. Toss beet greens with onions and serve with the dressing drizzled over top.


Enjoy,
Mary

© Cooking with Mary and Friends. Unauthorized use and/or duplication of this material without express and written permission from this blog’s author and/or owner is strictly prohibited. Excerpts and links may be used, provided that full and clear credit is given to Cooking with Mary and Friends with appropriate and specific direction to the original content.

Thursday, February 6, 2014

Irish Stew with Beer & Wine


Irish stew (Irishstobhach / Stobhach Gaelach) is a traditional stew made from lamb, or mutton (mutton is used as it comes from less tender sheep over a year old, is fattier, and has a stronger flavor, and is generally the most traditional variation used) as well as potatoes, onions, and parsley. It may sometimes also include carrots. Irish stew is also made with kid goat. (http://en.wikipedia.org/wiki/Irish_stew)
Irish stew is a celebrated Irish dish, yet its composition is a matter of dispute. Purists maintain that the only acceptable and traditional ingredients are neck mutton chops or kid, potatoes, onions, and water. Others would add such items as carrots, turnips, and pearl barley; but the purists maintain that they spoil the true flavor of the dish. The ingredients are boiled and simmered slowly for up to two hours. Mutton was the dominant ingredient because the economic importance of sheep lay in their wool and milk produce and this ensured that only old or economically non-viable animals ended up in the cooking pot, where they needed hours of slow cooking. Irish stew is the product of a culinary tradition that relied almost exclusively on cooking over an open fire. It seems that Irish stew was recognized as early as about 1800...

Today you can find many recipes for Irish Stew, some with beef and some with lamb ... no matter how you make it, this is comfort food at its best. 


RECIPE

Ingredients
1 1/2-2 lbs. stew beef (lamb is traditional)
1/2 cup flour
1-2 tsp. minced garlic
1 cup Guinness beer or other dark beer
1/2 cup red wine
*4 cups homemade beef base or beef bone broth
1 small can tomato paste
1 tbsp. sugar
1 tbsp. dried thyme leaves
1 tbsp. Worcestershire sauce
2 bay leaves
2 stalks celery, chopped
1 large onion, chopped
5-6 red or Yukon gold potatoes, peeled and cut into chunks
5-6 large carrots, peeled and cut into chunks
2-3 turnips, peeled and cut into chunks
Salt and pepper to taste

Method

Combine beef pieces and flour in a zip-top bag and shake to coat; place all in a slow cooker sprayed with cooking spray.  Add the next 11 ingredients and stir to mix well.

Cover and cook on low 8-10 hours or on high 4-6 hours.  If you're in a hurry, parboil the potatoes, carrots ad turnips until partially cooked; add to slow cooker and turn on high for 30 minutes and cook until softened.  Otherwise, add the potatoes, carrots and turnips during the last 2 hours of cooking time (be sure to turn the slow cooker to high).

Serve stew immediately with a nice crusty bread for dunking in the stew.

*Beef base - To make a quick beef base, roast beef bones (soup bones, rib bones) in a large roasting pan several hours (this is going to take about 3 hours) in a 250-300 oven until the marrow is cooked. Add 8 cups water and cook an additional hour or two until broth has reduced in half. Add salt, pepper and garlic powder to taste. At this point, you can either "put it up" by canning it in a pressure canner or freeze it for use another time. I like to make the beef base and keep it on hand for when I want to use some, such as in this stew recipe. It's also amazing in vegetable beef soups, French onion soup, or almost anything calling for a hearty beef base. You can also use homemade beef bone broth.

Alcohol substitutes - If you'd rather not use the beer and wine, substitute non-alcoholic beer for the Guinness and apple cider or unsweetened grape juice for the wine. Some balsamic vinegar or red wine vinegar could also be added a teaspoon at a time until the flavor is where you like it.

Also seen on Meal Plan Monday

Enjoy,

Mary

© Cooking with Mary and Friends. Unauthorized use and/or duplication of this material without express and written permission from this blog’s author and/or owner is strictly prohibited. Excerpts and links may be used, provided that full and clear credit is given to Cooking with Mary and Friends with appropriate and specific direction to the original content.


Sunday, December 22, 2013

French Dip Sandwiches


I love making these French Dip sandwiches after we've had a Prime Rib Roast dinner. I have my husband shave the beef with his electric knife, which works perfectly to get paper-thin slices of beef.


Thinly sliced roast beef topped with cheese and caramelized onions on crusty bread then dipped in a rich broth made with beef bone broth. Heaven on a plate!


Recipe
Ingredients
Shaved slices of roasted prime rib
2 Portuguese hard rolls, split in half (or any other hard roll)
Butter to spread on rolls
Cooking spray
Garlic powder
Caramelized onions (see procedure below)
Shredded Mozzarella cheese (or any thin sliced or shredded white cheese; i.e. Provolone, Monterrey Jack, Swiss)

Method
Preheat oven to 350.  Split rolls in half; spray outside of rolls with cooking spray (or oil), butter inside of rolls and sprinkle with garlic powder. Place on large baking sheet and cook several minutes or until rolls are lightly toasted.

Remove from oven and top with shaved beef and cheese. Top this with caramelized onions using slotted spoon.  Return to oven and continue to bake until cheese is melted.

Remove from oven, place tops of rolls on sandwich and press down with a spatula.  Serve immediately with caramelized onion mixture to use as a dipping sauce.

Caramelized Onions
1 large onion, sliced
1/4 cup butter (1/2 stick)
1/4 cup red wine (cooking wine will work)
1 cup beef stock/broth (2 beef bouillon cubes heated in 1 cup water)

Method
Slice 1 large onion very thinly, separate onion into rings.  Melt butter in heavy saucepan and sauté over medium to med-high heat about 30 minutes, or until onions are well cooked and browning.  Add red wine and beef stock and simmer several minutes.  Remove from heat and set aside. Serve with French Dip sandwiches.

Enjoy,
Mary

© Cooking with Mary and Friends. Unauthorized use and/or duplication of this material without express and written permission from this blog’s author and/or owner is strictly prohibited. Excerpts and links may be used, provided that full and clear credit is given to Cooking with Mary and Friends with appropriate and specific direction to the original content.

Sunday, March 24, 2013

Italian-Style Beef Pot Roast


Who doesn't love a good pot roast?  Simple, slow cooked, one pot meals are definitely popular with many people and I think it's a wonderful way to have a GREAT meal to serve to your family. 

Traditional pot roasts are usually made with a brown gravy, or onion soup mix, along with potatoes, carrots and such. This pot roasts makes a twist on that and goes "Italian" for a very flavorful dinner.


RECIPE
Ingredients
1 - 3-4 lb. top round roast, chuck roast or round roast
1 large white onion, sliced
1 - 14.5 oz. can petite diced tomatoes 
1 - 14.5 oz. tomato sauce 
2-3 tsp. minced garlic
1-2 tsp. dried oregano
2 tsp. course-ground black pepper
1/2-3/4 cup red cooking wine
3-4 tbls. Balsamic vinegar
6 Yukon Gold or red potatoes, peeled and cut in 1/2 if too large (leave smaller potatoes whole)
6 large carrots, peeled and cut in 1/2 (if using small carrots, leave them whole)

Method
Spray a large slow cooker with cooking spay.

Mix onions, tomatoes, tomato sauce, seasonings, red wine and balsamic vinegar in the crock pot, add roast and spoon mixture to cover roast.  Cover and cook on low heat 8 hours.

Two hours before roast is done, add potatoes and carrots and continue to cook until vegetables are tender.

Remove roast from slow cooker to cutting board, cover with aluminum foil and let sit 10-15 minutes before carving.

When ready to serve, remove vegetables from slow cooker and serve with the roast and some of the sauce spooned over all.

This is delicious served with some Hearth Bread to sop up the sauce with!

*Note - when carving, cut meat across the grain. 

Enjoy,

Mary

© Cooking with Mary and Friends. Unauthorized use and/or duplication of this material without express and written permission from this blog’s author and/or owner is strictly prohibited. Excerpts and links may be used, provided that full and clear credit is given to Cooking with Mary and Friends with appropriate and specific direction to the original content.


Thursday, September 6, 2012

Veggie Beef Soup


Updated October 2019

In South Carolina, sometime in the early Fall, the humidity and temps drop to overnight lows in the high 50's to low 60's and highs only in the low 80's ... ok, that's cool enough here to feel a bit like Fall! I especially can't wait for all the tastes and foods Fall brings with it, such as stews and soups, apple crisps and cobblers, baked butternut squash and other goodies.


I love all kinds of soups and stews, and we have them quite often during the Fall and Winter seasons.  This Veggie Beef Soup is one of my all-time favorites and you can use any beef/meat you want, or mix up the vegetables to make it your own. It's one of those versatile, anything goes kind of soup!  Enjoy!


RECIPE
Ingredients
1-2 lbs. cut-up beef pieces such as stew beef (or ground beef)  
1-2 tbls. olive oil
1 large onion, chopped
2 celery stalks, chopped/diced
1 - 14.5 oz. can petite diced tomatoes 
1 - 14.5 oz. can tomato sauce 
4 cups beef stock or beef bone broth
2-3 Yukon Gold or Red potatoes, peeled, chopped/diced 
3 large carrots, chopped/diced
1-2 cups green beans 
1-2 cups corn kernels
1-2 tsp. Italian seasoning
1 tsp. Garlic salt
1-2 tsp. Course-Ground Black Pepper (or to taste)
other veggies could be butter beans and garden peas

Method

Add olive oil to stock pot and saute' beef until browned; add onions, celery, and seasonings, continue to cook until vegetables are soft.

Stir in tomatoes, tomato sauce and beef stock or beef bone broth; bring to a boil.  Reduce heat and let simmer approx. 1-2 hours (30 minutes if using ground beef) until beef is tender, stirring from time to time.

Add potatoes and carrots and return to a boil; reduce heat and simmer approx. 30 minutes. Stir in frozen green beans and corn; continue cooking until all vegetables are tender and heated through.

For slow cooker or crock pot - brown stew beef or ground beef, then mix it and all other ingredients in slow cooker or crock pot (sprayed with cooking spray - omit olive oil).  Cook on low 8-10 hours or until done.

Pressure Canning - This soup cans up very well. Brown the beef, then add all other ingredients, uncooked, to the beef, stirring together. In a large stock pot, bring to a simmer, then use a slotted spoon to fills jars 1/2 way with the solids, then a ladle to add the liquid which will insure you have 1/2 solids to 1/2 liquid (the soup will "cook" in the pressure canner). Process pint jars 75 minutes and quart jars 90 minutes at 11 lbs. pressure.

Jars are shelf-stable up to one year in your pantry.


Also seen on Meal Plan Monday

Enjoy,

Mary

© Cooking with Mary and Friends. Unauthorized use and/or duplication of this material without express and written permission from this blog’s author and/or owner is strictly prohibited. Excerpts and links may be used, provided that full and clear credit is given to Cooking with Mary and Friends with appropriate and specific direction to the original content.